Set per-tool permissions for your Grok Bot connectors
Connector pages now let you set each tool to Always allow, Auto-review, Needs approval or Blocked. Here is a least-privilege setup on a demo connector, and what to do when a reconnect card appears.
About 20 minutes · Intermediate · Grok Bot · Updated: 21 Nov 2026
Until now, connecting an app to Grok Bot mostly meant deciding whether the app was connected at all. The Grok Bot changelog entry for v1.2.3, dated 18 November 2026 and titled “Tool permissions and routine reconnect cards,” makes it finer-grained: “Connector pages let you set each tool to Always allow, Auto-review, Needs approval, or Blocked.” The changelog marks that feature “Requires Grok Bot 0.70.2 or later.”
In this tutorial you will set every tool on one connector to one of those four states, keep them apart from Grok Bot’s other approval controls, and learn what to do when a reconnect card appears. The same release changes how reconnect cards reach you and what happens to a routine that loses its sign-in.
Everything here comes from the official changelog and the Grok Bot docs at docs.x.ai, checked on 19 November 2026 (UTC), and from a real connector page (Canva) in the Grok Bot iPhone app, checked on 21 November 2026. One limit: the docs still don’t describe the four states. So we use the changelog’s names exactly, and quote only what the app itself says about them. Figures 1 and 2 are real app screenshots with personal details hidden. Figures 3 and 4 are explanatory diagrams.
Prerequisites
- ✓ Grok Bot 0.70.2 or later for the per-tool states on connector pages.
- ✓ Grok Bot 0.79.2 or later for the new reconnect-card delivery (notification and Slack or Microsoft Teams direct message).
- ✓ A connector to practise on. Use a test or demo account if you can, not your main inbox, calendar or code.
- ✓ On a team? Your admin decides which connectors you can use. See “On a team account” below.
What you’ll build
By the end of this guide, you will have:
- ✓ One connector with every tool set to a named state.
- ✓ A short note of which tool is in which state, and why.
- ✓ A known path for a reconnect card, and a check that your routines are still running.
What we’re building, and why this example
The point of per-tool settings is least privilege: a connector should be able to do what a workflow needs, and nothing else. Grok Bot’s docs put the reason plainly: “A connected app is available to every Bot you run.” One loose setting therefore applies to every Bot you run.
Our example is a generic notes-style demo connector with four kinds of tool: one that searches, one that reads, one that creates, and one that deletes. Real connectors have their own tool lists, but most fall into those same kinds, so the method carries over.
Step 1 — Open Connect apps
On a computer, apps are not in the Grok Bot settings dialog. The settings docs say so directly: “Apps aren’t in settings. Open Connect apps in the sidebar.” The phone is different, as shown below.
- On a computer, open Connect apps from the sidebar, or follow an in-chat Connect card if the Bot offers one.
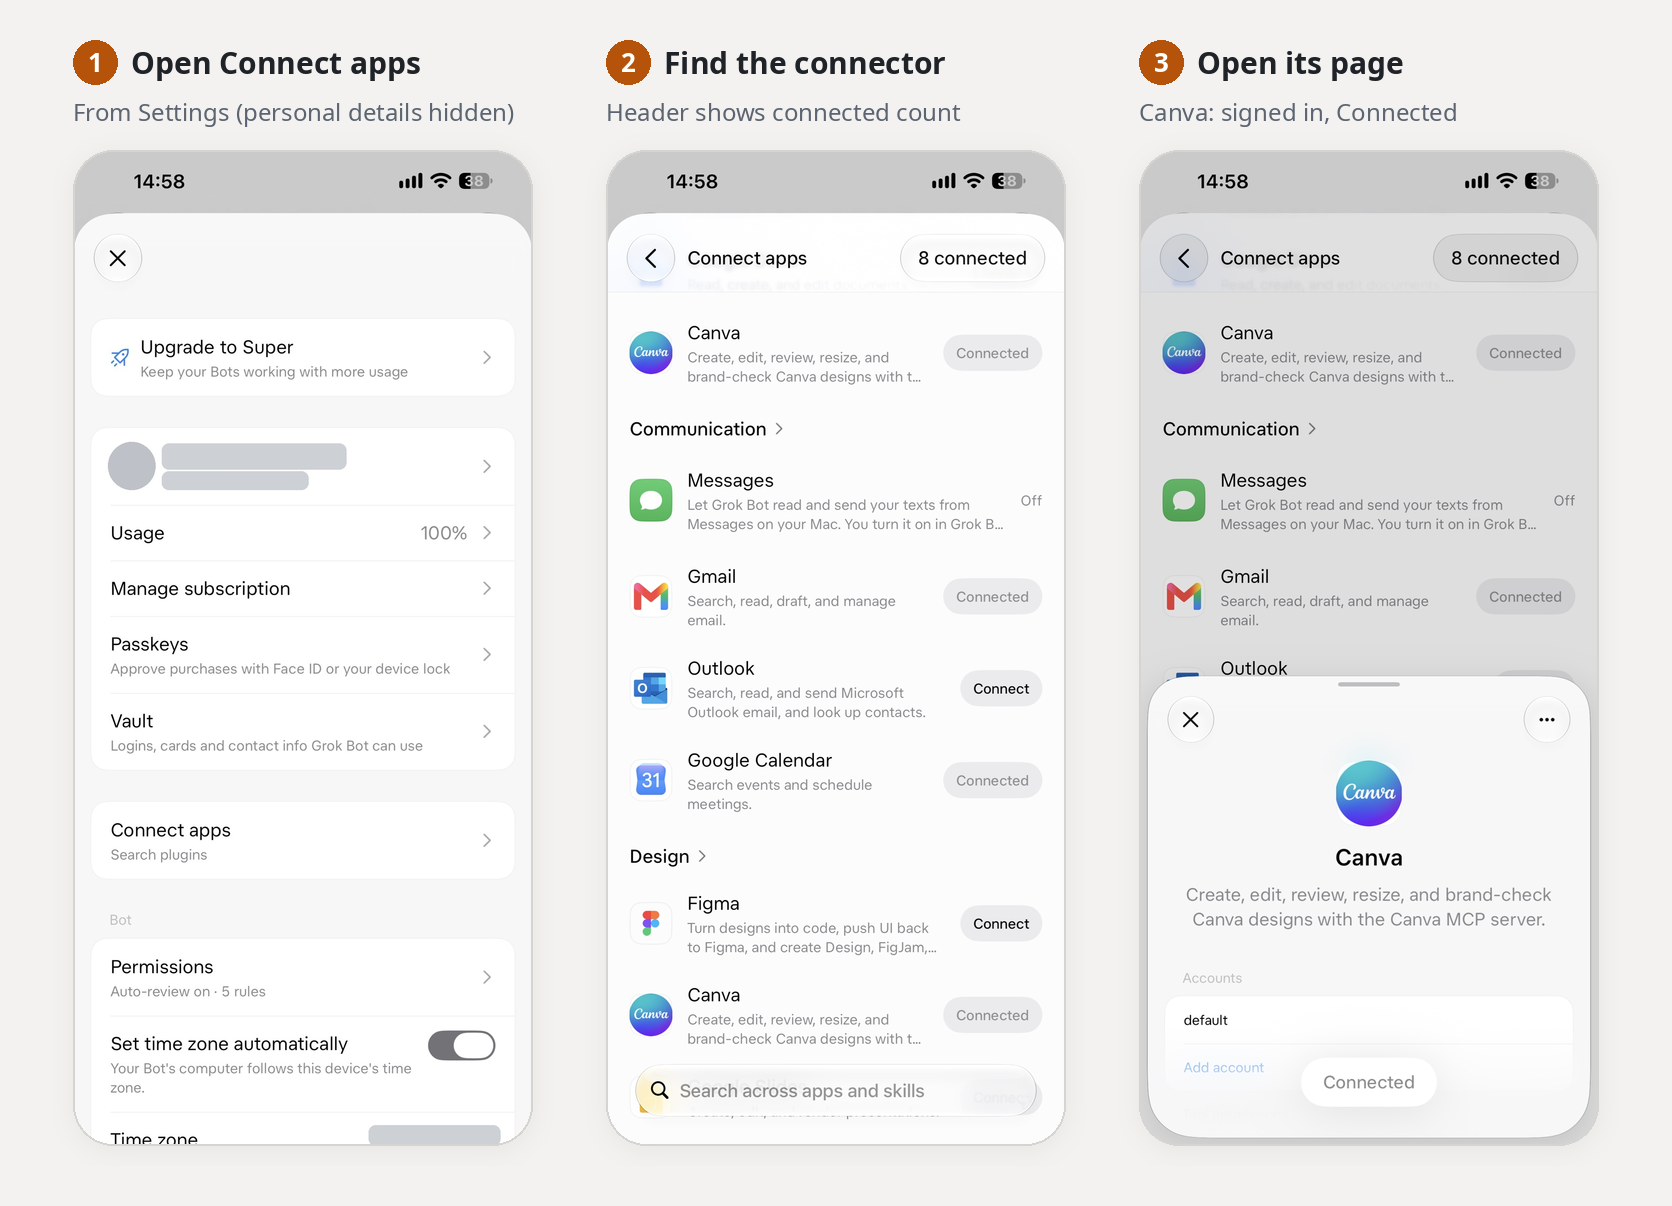
- On a phone, tap your avatar at the top left and choose Connect apps. In our iPhone app, that opens a Settings sheet with a Connect apps row labelled “Search plugins” (Figure 1).
Checkpoint: you can browse or search the app catalog.
Step 2 — Add the connector and sign in
Browse or search for the app, add it, then Authorize or Authenticate in the browser. Confirm that it appears under Installed. To manage what you have installed, the settings docs say to “select the connected count next to the title.” On the phone that is the button in the header, such as 8 connected.
Watch one label in particular. Added means installed, not signed in. If the app shows Needs auth or Disconnected, open it and choose Authenticate (Authorize on the phone).
Checkpoint: the connector is listed under Installed and signed in.
Step 3 — Open the connector page and list its tools
Open the connector you just installed. The changelog calls this its connector page, and the settings docs note that “individual app tools can be enabled or disabled.”
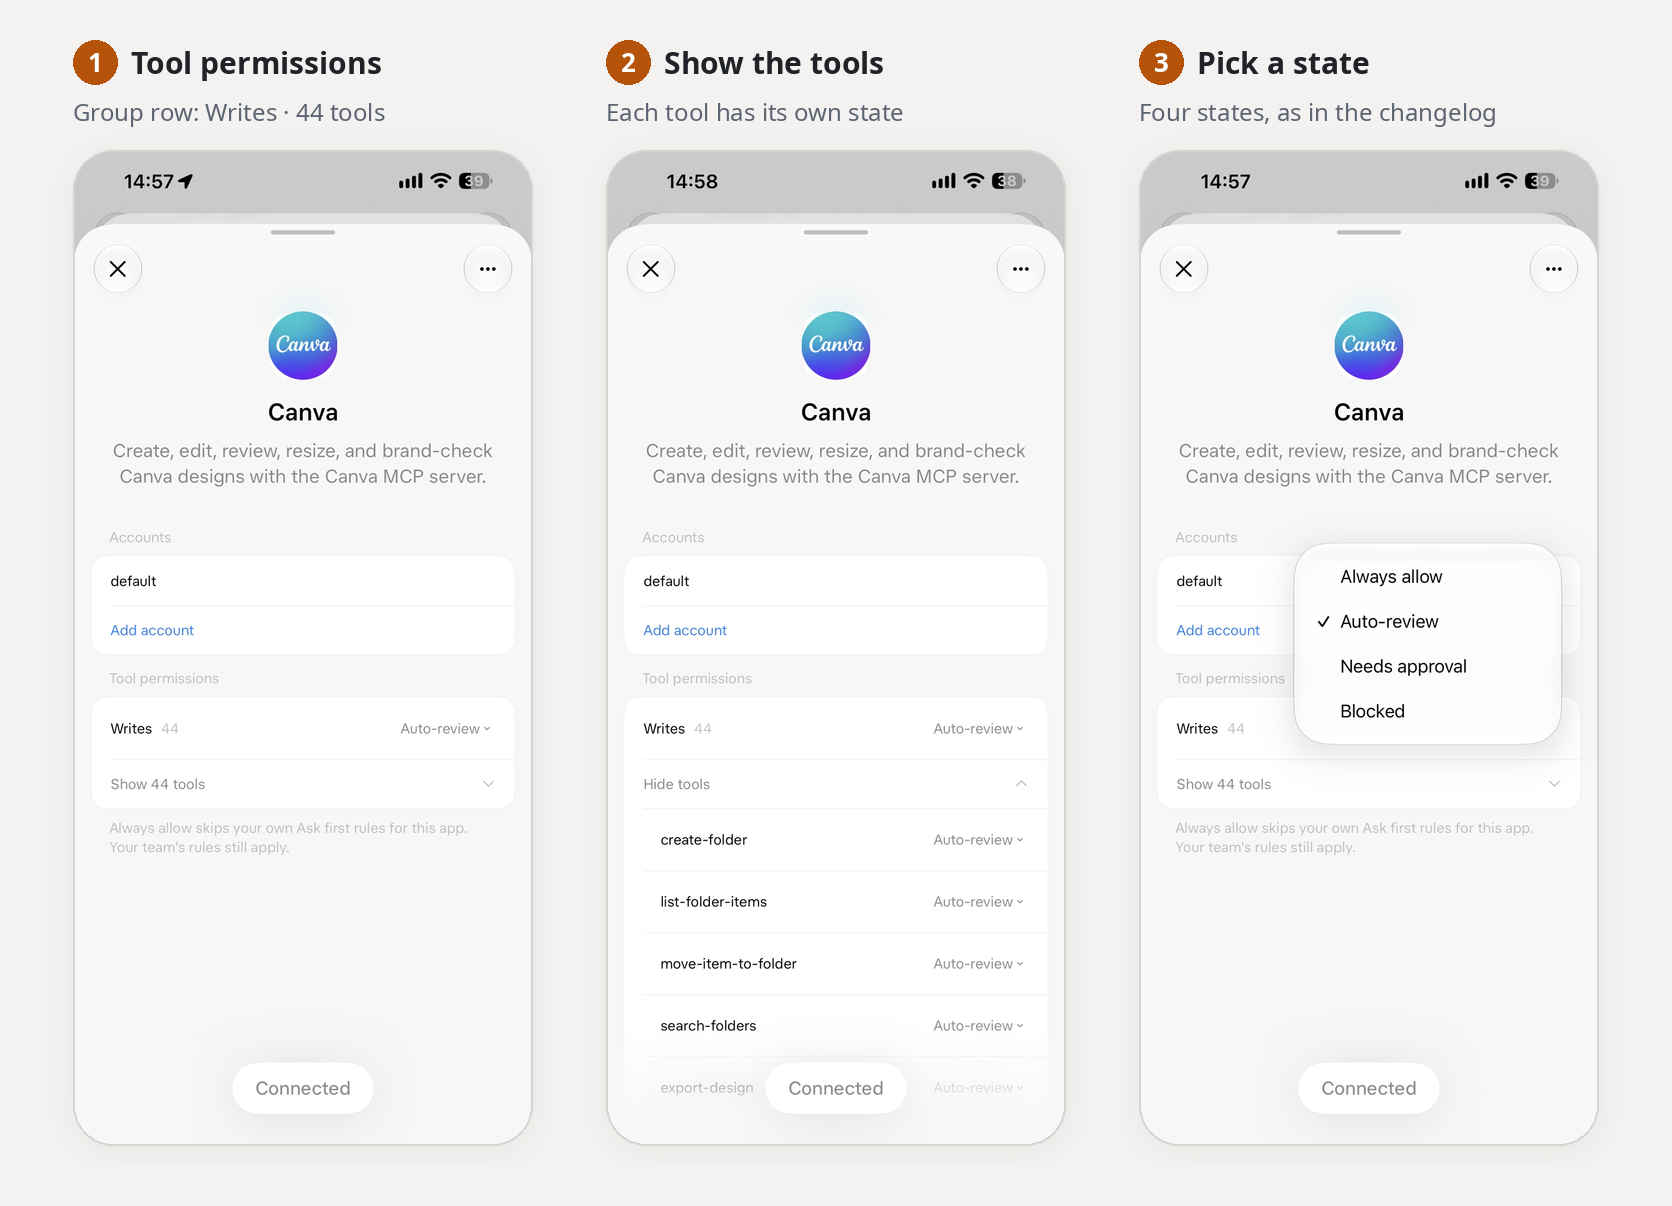
Here is what the page showed for Canva in our iPhone app (Figure 2). Under Accounts sits the signed-in account. Below it, a Tool permissions section groups the tools. Canva had one group, Writes, with 44 tools and its own state menu. Show 44 tools opens the list, and each tool there has its own menu. Every tool was on Auto-review when we opened the page.
Don’t trust the group label alone. Canva put all 44 tools under Writes, including list-folder-items and search-folders, whose names suggest they only read. Sort by what each tool does.
Before you change anything, write down every tool on the page and sort it into one of four groups:
- It only reads or searches.
- It creates, sends or publishes something.
- It deletes or changes something that is hard to undo.
- Your workflow doesn’t need it at all.
Checkpoint: every tool on the page is in one group.
Step 4 — Set each tool to a state
Now set each tool to one of the four states. Tap a tool’s current state to open the menu: Always allow, Auto-review, Needs approval or Blocked. The group row has the same menu. The pairing below is our suggestion, not an official definition. We based it on the official least-privilege advice to “keep sending, publishing, purchasing, deletion, and production changes behind approval.”
| Tool group | Our suggested state | In our demo connector |
|---|---|---|
| Reads or searches | Auto-review | search_notes |
| Creates, sends or publishes | Needs approval | create_note |
| Deletes or makes hard-to-undo changes | Needs approval, or Blocked if the workflow never deletes | delete_note |
| Not needed | Blocked | Anything else on the page |
| A narrow, low-risk read you use constantly | Always allow | read_note |
Use Always allow sparingly, and only for tools that cannot send, publish, buy, delete or change anything important. The connector page explains why: “Always allow skips your own Ask first rules for this app. Your team’s rules still apply.”
Checkpoint: every tool shows one of the four names, and your note says why.
Step 5 — Try it with a harmless request
In a chat, type @ to attach the app, then ask for something read-only, such as a search in your demo account. Then, still in the demo account, ask for something that would create a note.
Apart from that note on Always allow, the app and the docs don’t yet spell out what each state does, so watch what happens and compare it with what you intended. If a tool behaves more freely than you want, move it one step tighter.
Checkpoint: the read request and the write request each behave the way your note says they should. If not, adjust the state and try again.
These are not the same controls
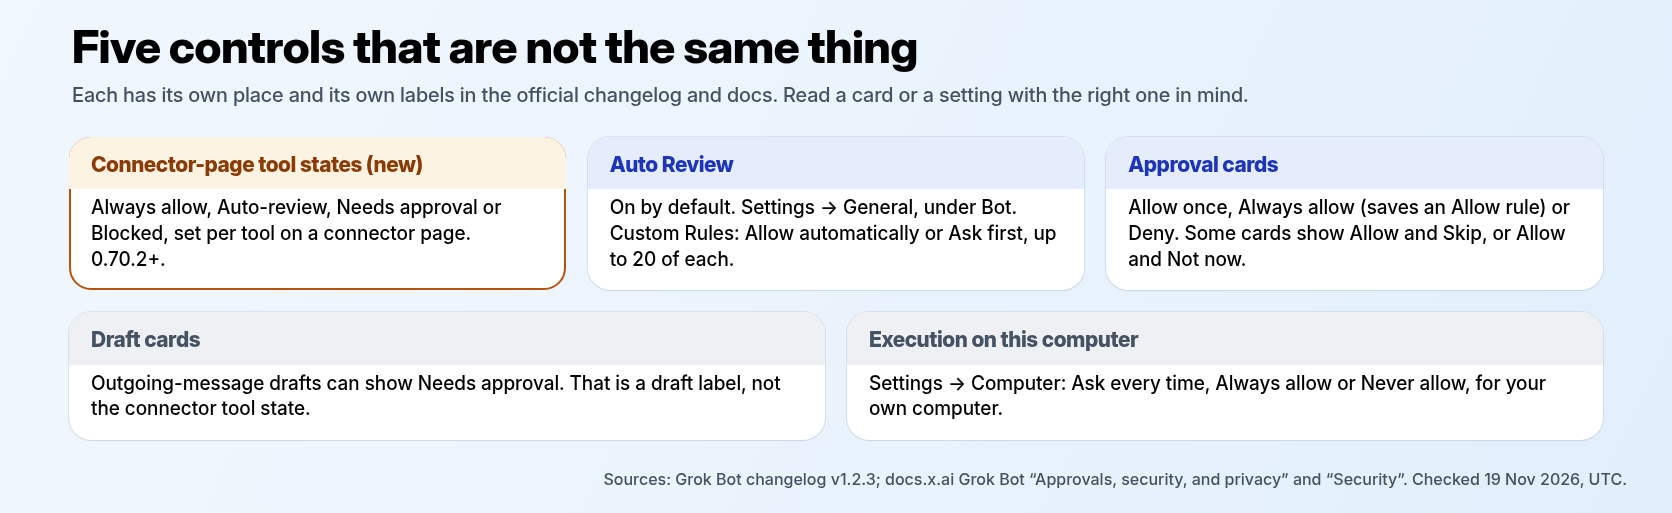
Grok Bot already had several controls with similar-sounding names. They are separate settings, in different places, with their own labels. Keep them apart.
- Connector-page tool states (new in v1.2.3): Always allow, Auto-review, Needs approval or Blocked, per tool.
- Auto Review: on by default. The switch is in Settings → General, under Bot (on the phone, the Bot group of Settings, where our iPhone app shows it as Permissions with the Auto-review status and your rule count). With it on, Custom Rules lets you write “When Grok Bot wants to:” and “It should:” rules, choosing Allow automatically or Ask first. You can have up to 20 of each, of up to 1,000 characters.
- Approval cards: Allow once, Always allow or Deny. Here, Always allow saves an Allow rule, and the card shows Saved to Custom Rules. The docs add: “If you already have 20 Allow rules, Always allow on a card replaces your oldest Allow rule.” Terminal-command cards show Allow and Skip instead, and Ask-first cards show Allow and Not now. Group chats don’t offer Always allow, and background cards expire after 30 minutes.
- Draft cards: outgoing-message drafts can show Needs approval. That is a label on a draft, not the connector tool state with the same name.
- Execution on this computer: under Settings → Computer → Your computer (shown as Execution on Local Computer until a desktop is listed), with Ask every time, Always allow or Never allow. It covers your own computer, not connectors.
Note that “Always allow” appears in three places: on a connector tool, on an approval card and in Execution on this computer. They are three different settings. One link is worth knowing: on a connector, Always allow “skips your own Ask first rules for this app,” though your team’s rules still apply.
When a reconnect card appears
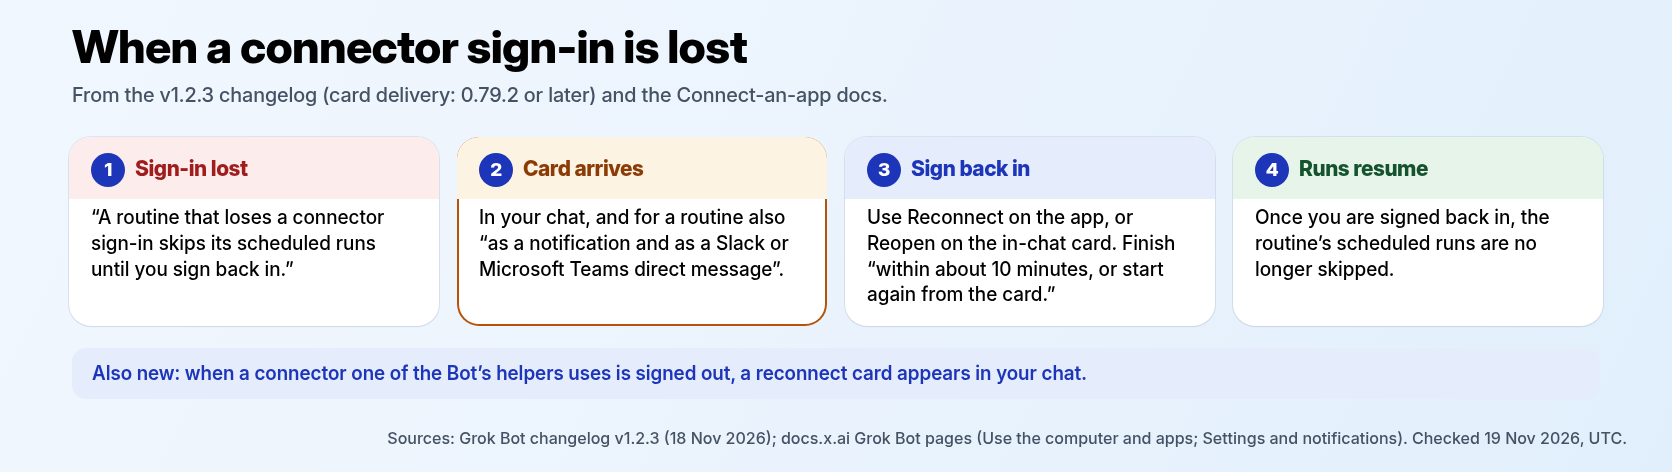
Sign-ins can lapse, and v1.2.3 changes what you see when one does. From the changelog:
- “A routine that loses a connector sign-in skips its scheduled runs until you sign back in.”
- “When a routine needs you to reconnect an account, its reconnect card also arrives as a notification and as a Slack or Microsoft Teams direct message.” (0.79.2 or later)
- “When a connector one of the Bot’s helpers uses is signed out, a reconnect card appears in your chat.” (0.79.2 or later)
Step 6 — Sign back in from the card
When a reconnect card arrives, sign in again straight away. The docs give two routes: Reconnect on the app if sign-in doesn’t finish, or Reopen on the in-chat card. Finish sign-in “within about 10 minutes, or start again from the card.”
Then check your routines. A routine with a lost sign-in skips its scheduled runs, so anything that should have run in the meantime did not.
Checkpoint: the connector is signed in again and the routine’s next scheduled run goes ahead.
On a team account
If you use Grok Bot on a team, some of this is your admin’s call. The docs say “Grok Bot inherits your team’s Cursor connector policy,” and “members find permitted connectors under Connect apps.” A blocked app shows Disabled by team admin. The v1.2.3 changelog adds:
- “Team admins can limit which tools the built-in GitHub connector offers, and the Bot says when a team admin limited a tool.”
- “The built-in GitHub connector follows your team’s MCP allowlist, so it is off unless a rule allows it.”
- “When a team rule blocks one of the Bot’s tools, the Bot tells you a team admin can change it in the team’s MCP settings.”
- On Enterprise, admin MCP rules also stop plugins managed by your identity provider, and the connector list marks them Blocked by team admin.
If a tool is blocked by your admin, ask them; these limits come from your team’s settings, not from your own connector page.
Troubleshooting
- You don’t see the four states. Check your version. The changelog says the feature “Requires Grok Bot 0.70.2 or later.”
- No reconnect notification or Slack or Teams message. That delivery needs 0.79.2 or later.
- A routine didn’t run. Check its connectors. A routine with a lost sign-in “skips its scheduled runs until you sign back in.”
- The app says Added, but the Bot says it’s missing. Added means installed, not signed in. Open the app and choose Authenticate (Authorize on the phone).
- Sign-in didn’t finish. Use Reconnect on the app or Reopen on the card, and finish within about 10 minutes.
- A tool says it is blocked by a team admin. Ask your team admin; it isn’t a personal setting.
Keep it least-privilege
Per-tool states are one part of a wider habit. Grok Bot’s docs list a “least-privilege setup”:
- Connect only the tools a workflow needs.
- Use scoped service accounts where supported.
- Start with read-only tasks and draft outputs.
- Keep sending, publishing, purchasing, deletion and production changes behind approval.
- Review installed connectors and active routines regularly.
- Pause a routine when its source system or expected workflow changes.
- Preserve source links and an action log for important decisions.
The docs also note that “OAuth tokens are held on Cursor’s connector backend, and the Bot invokes tools without receiving them.” Even so, every tool you leave open is something every Bot you run can use.
Related reading
- Hire Your First AI Teammate: Setting Up Grok Bot for Real Work
- Set up Grok Bot’s Vault safely: saved logins and cards for your bots
- How to optimize your Grok Bot usage effectively
- Give your AI agent a short leash: 5 permission settings to check today
Sources
- SpaceXSI, Grok Bot changelog, v1.2.3 (18 Nov 2026), “Tool permissions and routine reconnect cards”
- Grok Bot docs, Use the computer and apps: Connect an app
- Grok Bot docs, Settings and notifications
- Grok Bot docs, Approvals, security, and privacy
- Grok Bot docs, Security
- Grok Bot docs, Teams and enterprises
- Grok Bot docs, Chat and collaboration: Review a draft before it is sent
- Grok Bot docs, Skills and routines
Tutorial · November 2026 · changelog and docs checked 19 Nov 2026 UTC; connector page checked in the Grok Bot iPhone app 21 Nov 2026