- AI Productivity Insights
- Pages
- Configure Microsoft Entra External ID for Secure Patient Sign-up and Sign-in
Step-By-Step Implementation Walk Through:
Step 1: Configure Microsoft Entra External ID for Secure Patient Sign-Up and Sign-In
Purpose of Step 1 in the Overall Flow
Step 1 lays the foundation for secure authentication and identity management. By configuring Microsoft Entra External ID, you establish the tenant, user flow, and application registration required to support patient sign-up and sign-in.
This process generates several key values that are stored in the .env file and directly referenced in the Flask application (app.py) in Step 2 - Create the Flask Application for Medication Refill Form Submission:
Tenant ID (
TENANT_ID = 9a674bb7-9373-4714-bc7e-982a642fee53)Unique identifier for your Entra tenant. Used in the token endpoint to ensure authentication requests are routed correctly.
Tenant Name (
TENANT_NAME = aiproductivityinsights)Domain prefix of the tenant. Appears in the authorize and logout URLs to direct patients to the correct login domain.
Policy Name (
POLICY_NAME = SignUpSignIn)Defines the user flow for email/password sign-in. Appended to the token request so that authentication follows the configured flow.
Client ID (
CLIENT_ID = 877afb01-3e95-4a86-96ee-368184eb023c)Identifies the registered application. Included in both the authorization request and token exchange.
Client Secret (
CLIENT_SECRET = iJU8Q~ahUq2HSu.PiDZ8LHzllvb~C0FmUAF)Secret generated during app registration. Proves the authenticity of your Flask app during the token exchange.
Redirect URI (
REDIRECT_URI = <http://localhost:5000/auth/callback>)The return address used after successful login. Must match the configuration in Entra and is referenced in both the authorize and token requests.
Together, these values enable your Flask application to:
Redirect patients to the correct Entra login page (
/login).Handle the callback after sign-in (
/auth/callback).Securely exchange the authorization code for tokens.
Retrieve patient profile details from Microsoft Graph.
In short, Step 1 delivers the authentication backbone. It equips your project with the essential credentials and endpoints that the Flask application relies on. With this security layer in place, you can now move to Step 2: Create the Flask Application for Medication Refill Form Submission, where these values are consumed to implement a patient-facing form, validate user identity, and connect securely to downstream workflows.
The following section provides a comprehensive implementation walkthrough for Step 1:
Create Your Azure Free Account Or Pay As You Go | Microsoft Azure
After creating your account, you need to sign up for a subscription, which requires entering a credit card
Select “Microsoft Entra ID”

Choose “Manage tenants”

Select “Create”

Select a tenant type as “Microsoft Entra External ID” and then click “Next: Configuration >”

Set the Organization Name and Initial domain name. And then create new resource group for your reference.

Click “Next: review + Create >”

Click “Create”

Click on “Tenant creation was successful. Click here to navigate to your new tenant: your organization name.”
You are required to sign in again. Pick your account to continue to Microsoft Azure.
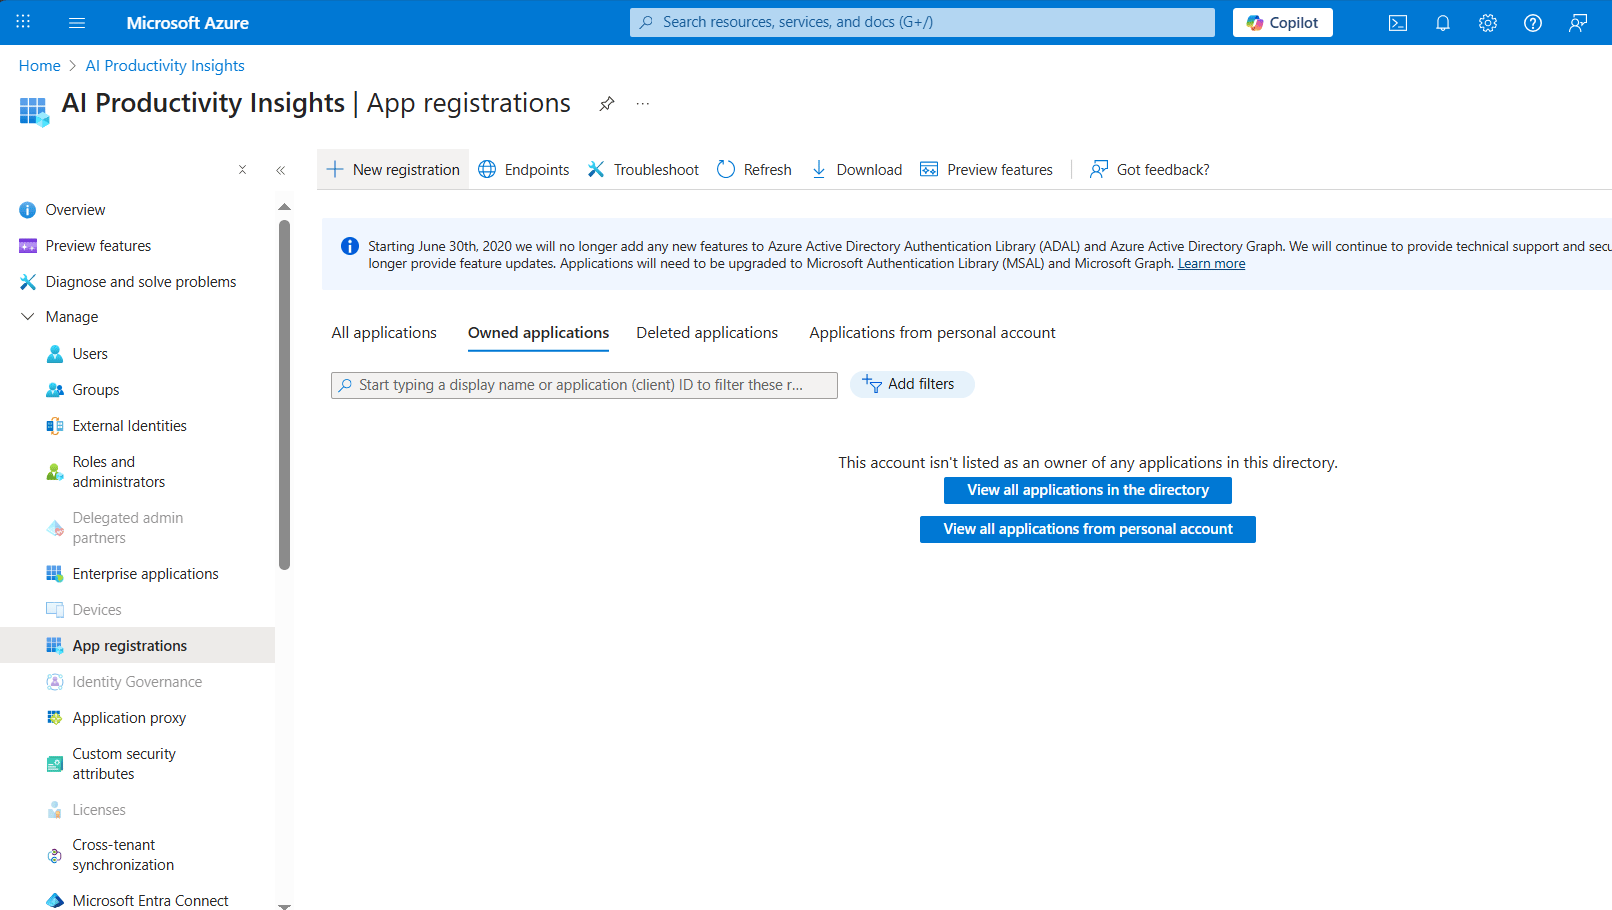
Select the "App registrations" submenu

Select “New registration”
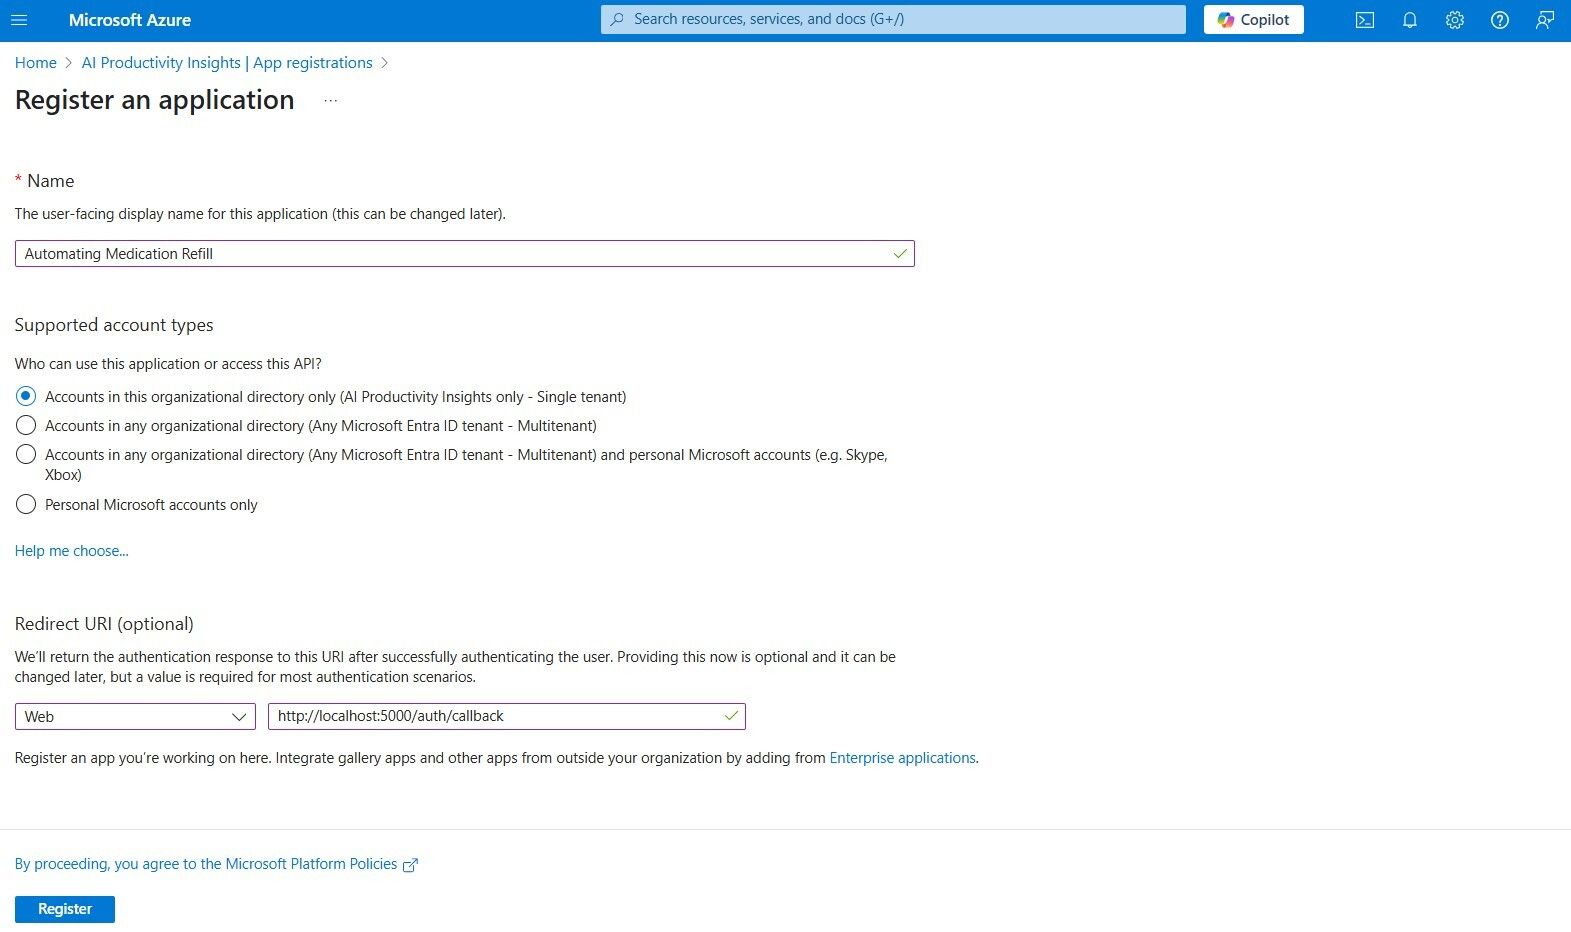
Set the name as "Automating Medication Refill" For "Who can use this application or access this API?" select "Accounts in this organizational directory only (your tenant name only - Single tenant)" Then set the Redirect URI type as "Web" with the URL: http://localhost:5000/auth/callback and then click register
Click the display name "Automating Medication Refill"

Click “API permissions” submenu

Add the following permissions and grant admin consent:
Configured Microsoft Graph API Permissions
Application.Read.All (Application) – Read all applications
Directory.AccessAsUser.All (Delegated) – Access directory as the signed-in user
Directory.Read.All (Application) – Read directory data
offline_access (Delegated) – Maintain access to data you have given it access to
openid (Delegated) – Sign users in
User.Read (Delegated) – Sign in and read user profile
User.Read.All (Application) – Read all users’ full profiles
User.ReadWrite.All (Delegated) – Read and write all users’ full profiles
User.ReadWrite.All (Application) – Read and write all users’ full profiles
Other Permissions Granted (not yet in configured list)
User.ReadWrite (Delegated) – Read and write access to user profile

Select the “External Identities” > “Custom user attributes” and add the following attributes:
City – String – The city in which the user is located. (Built-in)
Country/Region – String – The country/region in which the user is located. (Built-in)
Date of Birth – String – Patient’s Date of Birth. (Custom)
Display Name – String – Display name of the user. (Built-in)
Email Address – String – Email address of the user. (Built-in)
Gender – String – (Custom)
Given Name – String – The user’s given name (first name). (Built-in)
Hospital Number – String – Patient’s Hospital Number. (Custom)
Job Title – String – The user’s job title. (Built-in)
Postal Code – String – The postal code of the user’s address. (Built-in)
State/Province – String – The state or province in user’s address. (Built-in)
Street Address – String – The street address where the user is located. (Built-in)
Surname – String – The user’s surname (family/last name). (Built-in)

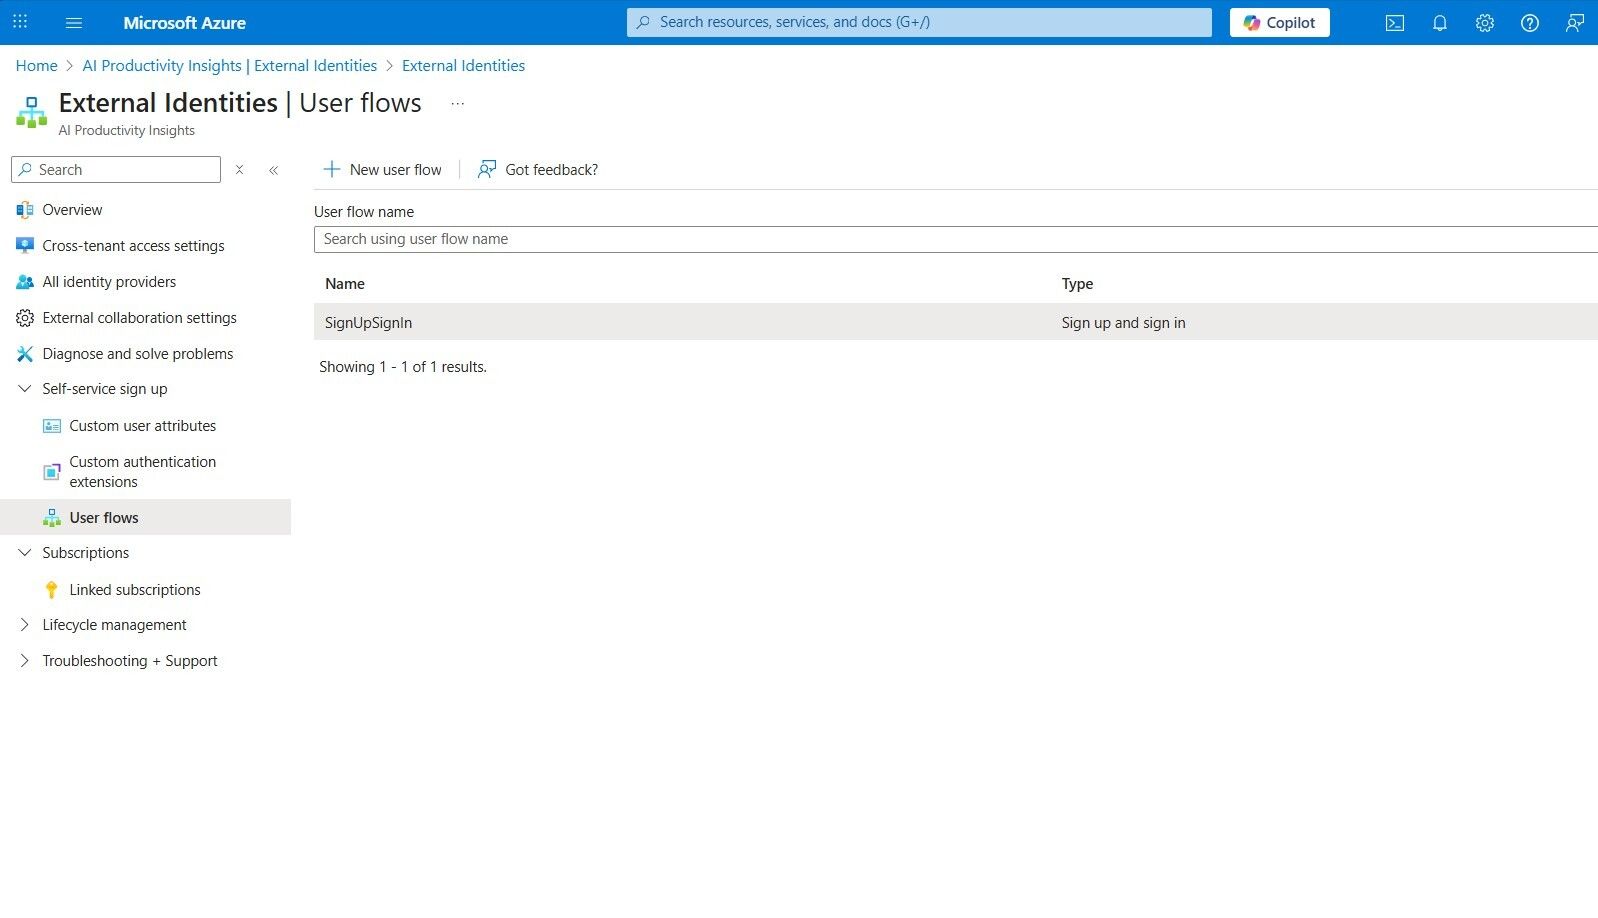
Select "External Identities" > "User flows" and add a new user flow named "
SignUpSignIn", choose "Email with password" as the Identity provider, then select the following attributes to collects:
City – String – The city in which the user is located. (Built-in)
Country/Region – String – The country/region in which the user is located. (Built-in)
Date of Birth – String – Patient’s Date of Birth. (Custom)
Display Name – String – Display name of the user. (Built-in)
Email Address – String – Email address of the user. (Built-in)
Gender – String – (Custom)
Given Name – String – The user’s given name (first name). (Built-in)
Hospital Number – String – Patient’s Hospital Number. (Custom)
Job Title – String – The user’s job title. (Built-in)
Postal Code – String – The postal code of the user’s address. (Built-in)
State/Province – String – The state or province in user’s address. (Built-in)
Street Address – String – The street address where the user is located. (Built-in)
Surname – String – The user’s surname (family/last name). (Built-in)


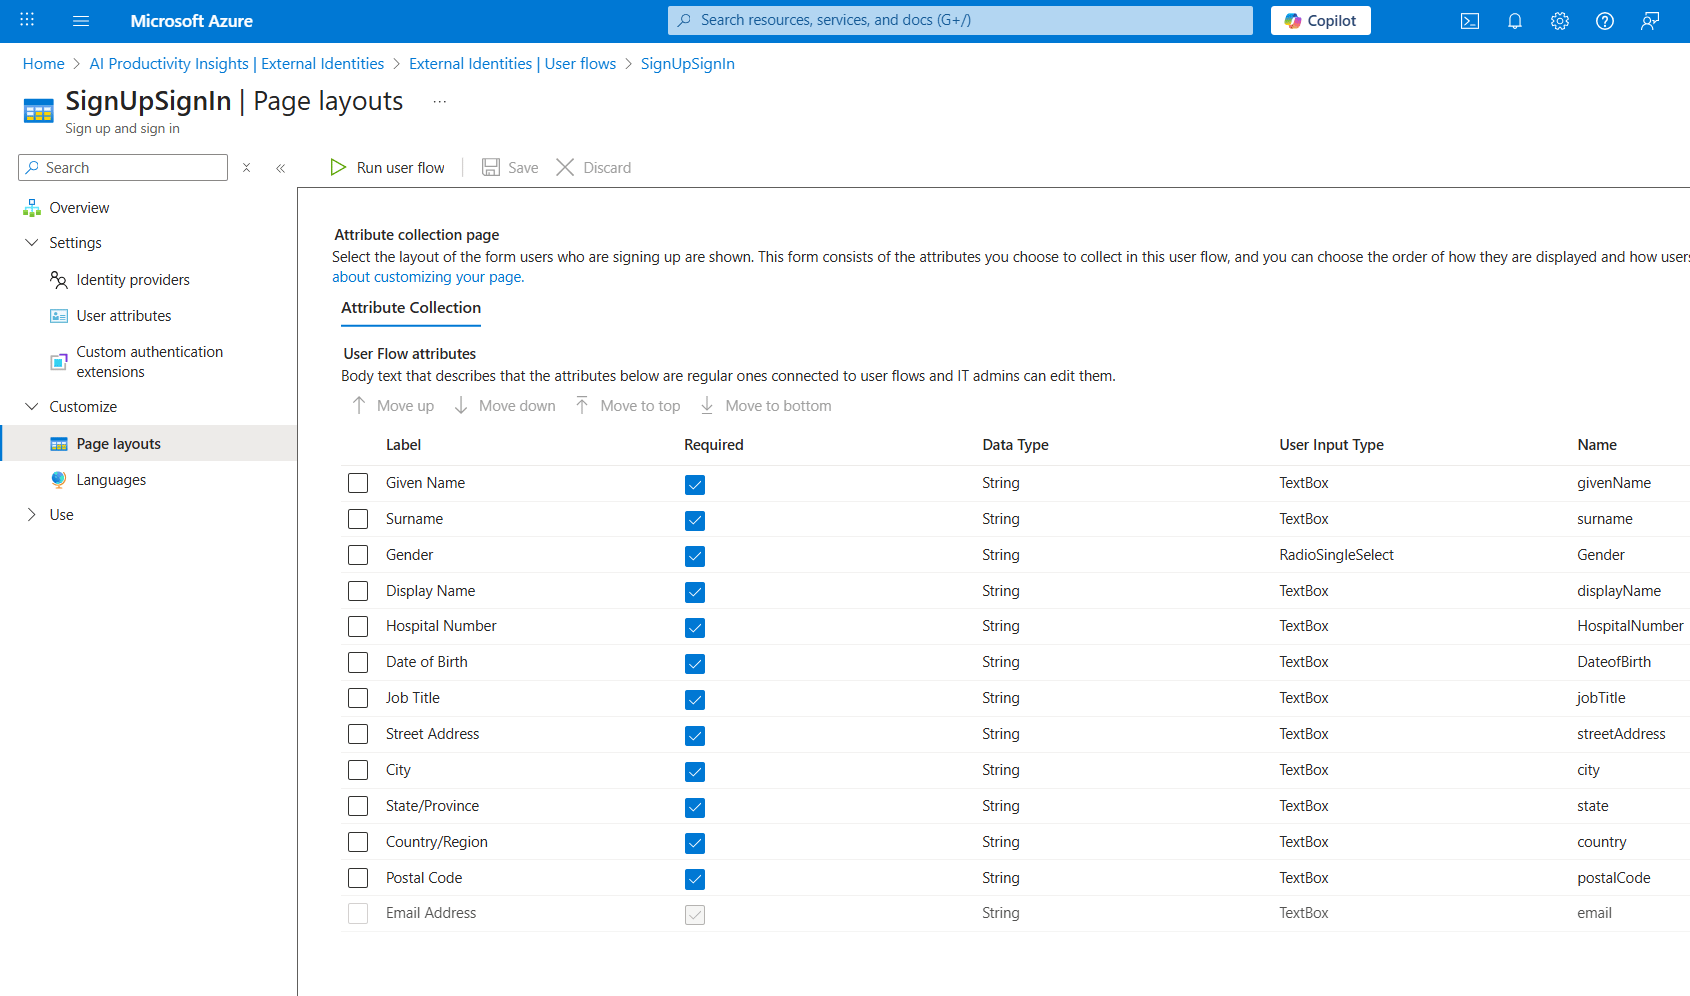
Navigate to the "Page layouts" submenu and arrange the user attributes in the following order by using the "Move up" and "Move down" buttons:
Given Name – String – TextBox –
givenNameSurname – String – TextBox –
surnameGender – String – RadioSingleSelect –
GenderDisplay Name – String – TextBox –
displayNameHospital Number – String – TextBox –
HospitalNumberDate of Birth – String – TextBox –
DateofBirthJob Title – String – TextBox –
jobTitleStreet Address – String – TextBox –
streetAddressCity – String – TextBox –
cityState/Province – String – TextBox –
stateCountry/Region – String – TextBox –
countryPostal Code – String – TextBox –
postalCodeEmail Address – String – TextBox –
email
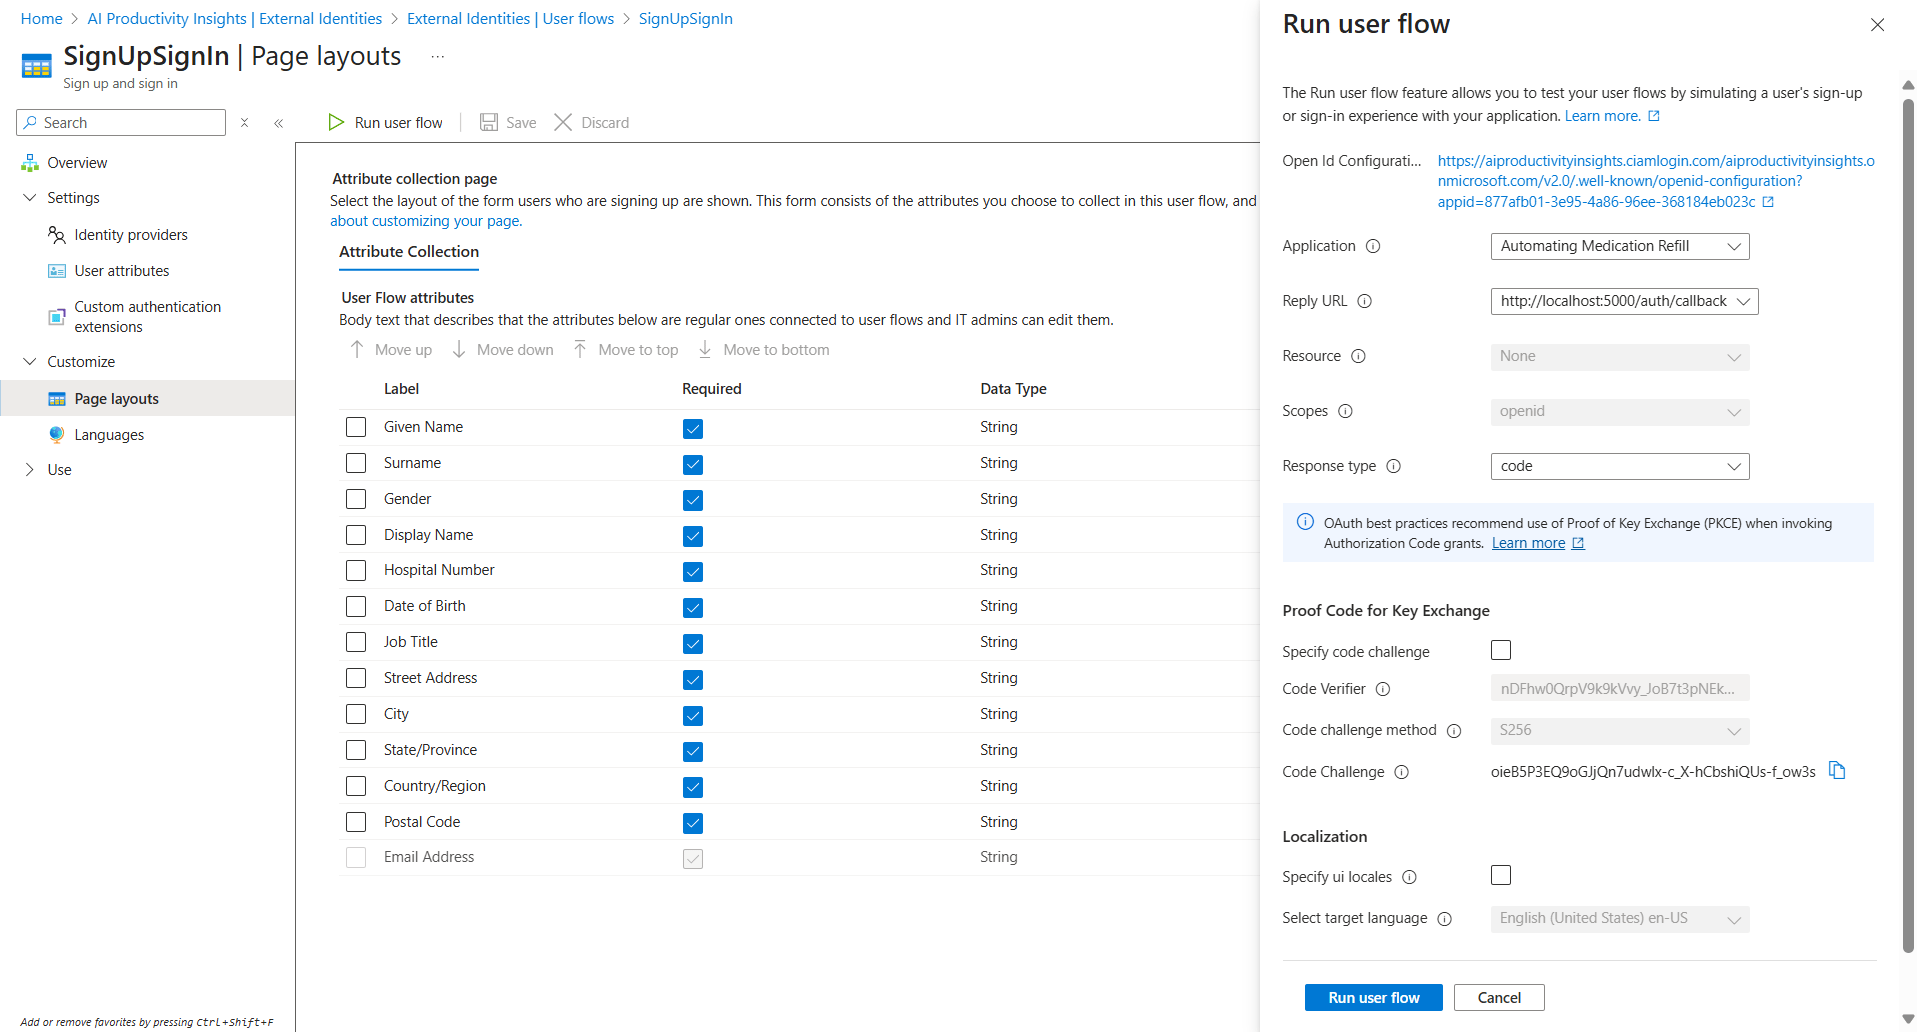
After completing all settings, click "Run user flow" to test the functionality. For this use case, uncheck "Specify code challenge." However, if you need to use "Proof Code for Key Exchange," you can modify "
app.py" in the Step 2 - Create Flask Web Application for Medication Refill Form Submission to handle this function.
Select “Create one”

Enter your email address to create a new account

Check your email for the account verification code

Log in to your email, enter the verification code, and click "Next"

Complete all required fields to set up your account, and click "Next"

Click “Yes” to stay signed in

Navigate to the "App registrations" submenu and click on "Automating Medication Refill" under Managed application in local directory

And then select the “Single sign-on” submenu

Add the follows new claims
DOB – user.DateofBirth (Custom)
Gender – user.Gender (Custom)
HN – user.HospitalNumber (Custom)

Select "Directory schema extension" as the source type and select “b2c-extentions-app” and click “Select”

Select Extension Attributes for the custom user attributes you created in Step 16. Note that these extension attributes will be stored in the "b2c-extensions-app".

At this stage, we will verify the authentication credentials and endpoints necessary for establishing secure communication between your Flask application and Microsoft Entra in Step 2 - Create the Flask Application for Medication Refill Form Submission.
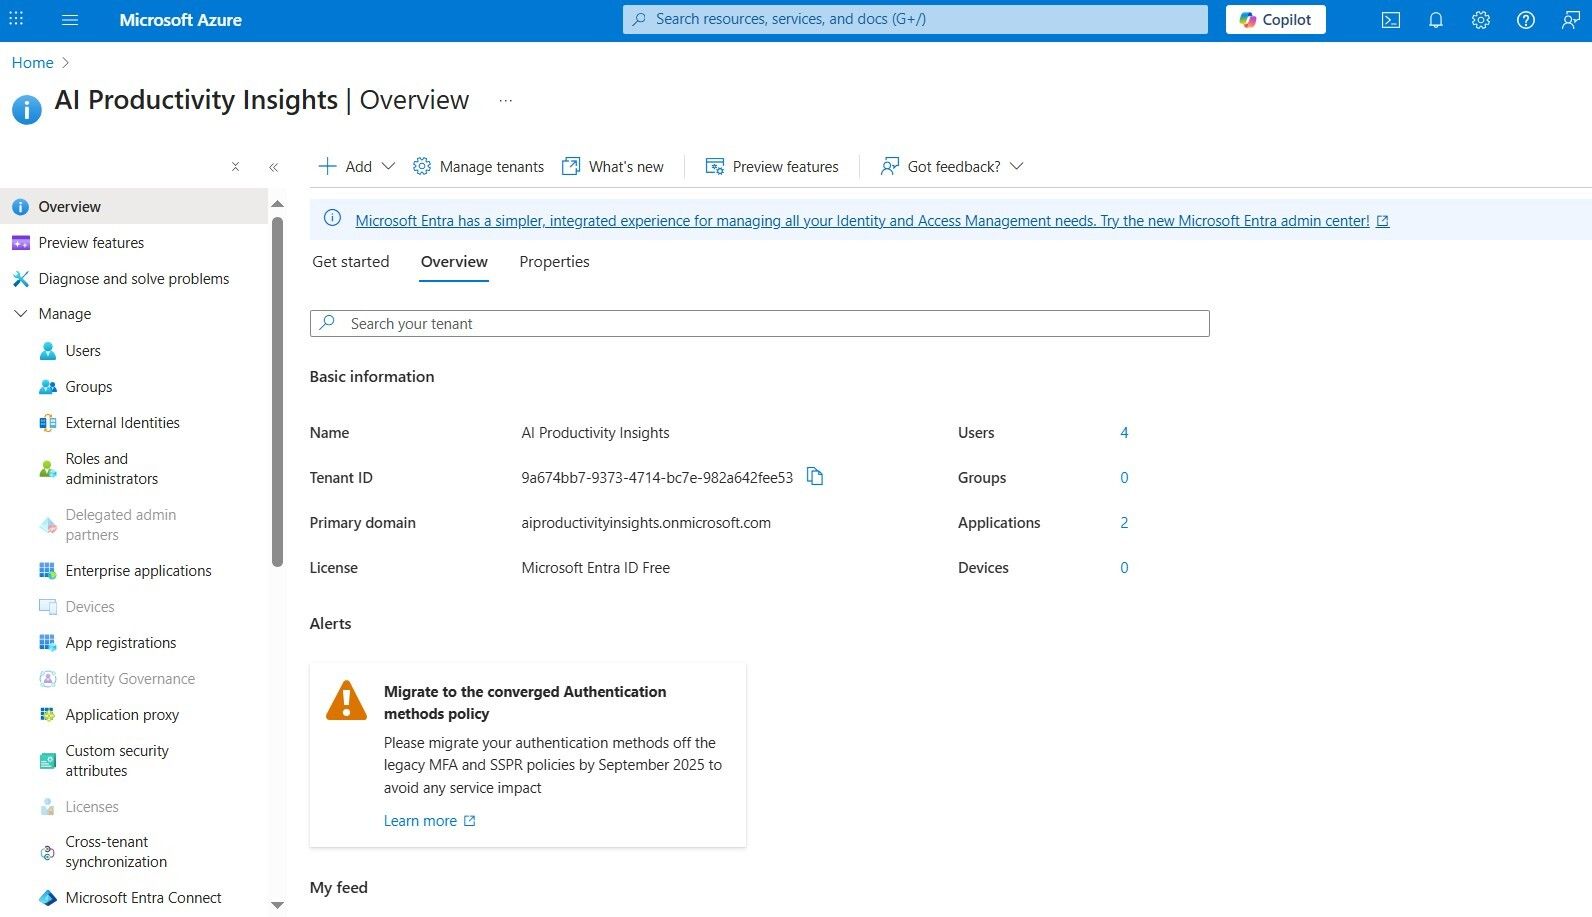
TENANT_IDTENANT_NAME(Primary Domain)
Locate this information in the Overview submenu of your tenant's name.
POLICY_NAME(User flow name)
Locate this information in the External Identities > User flow name submenu.
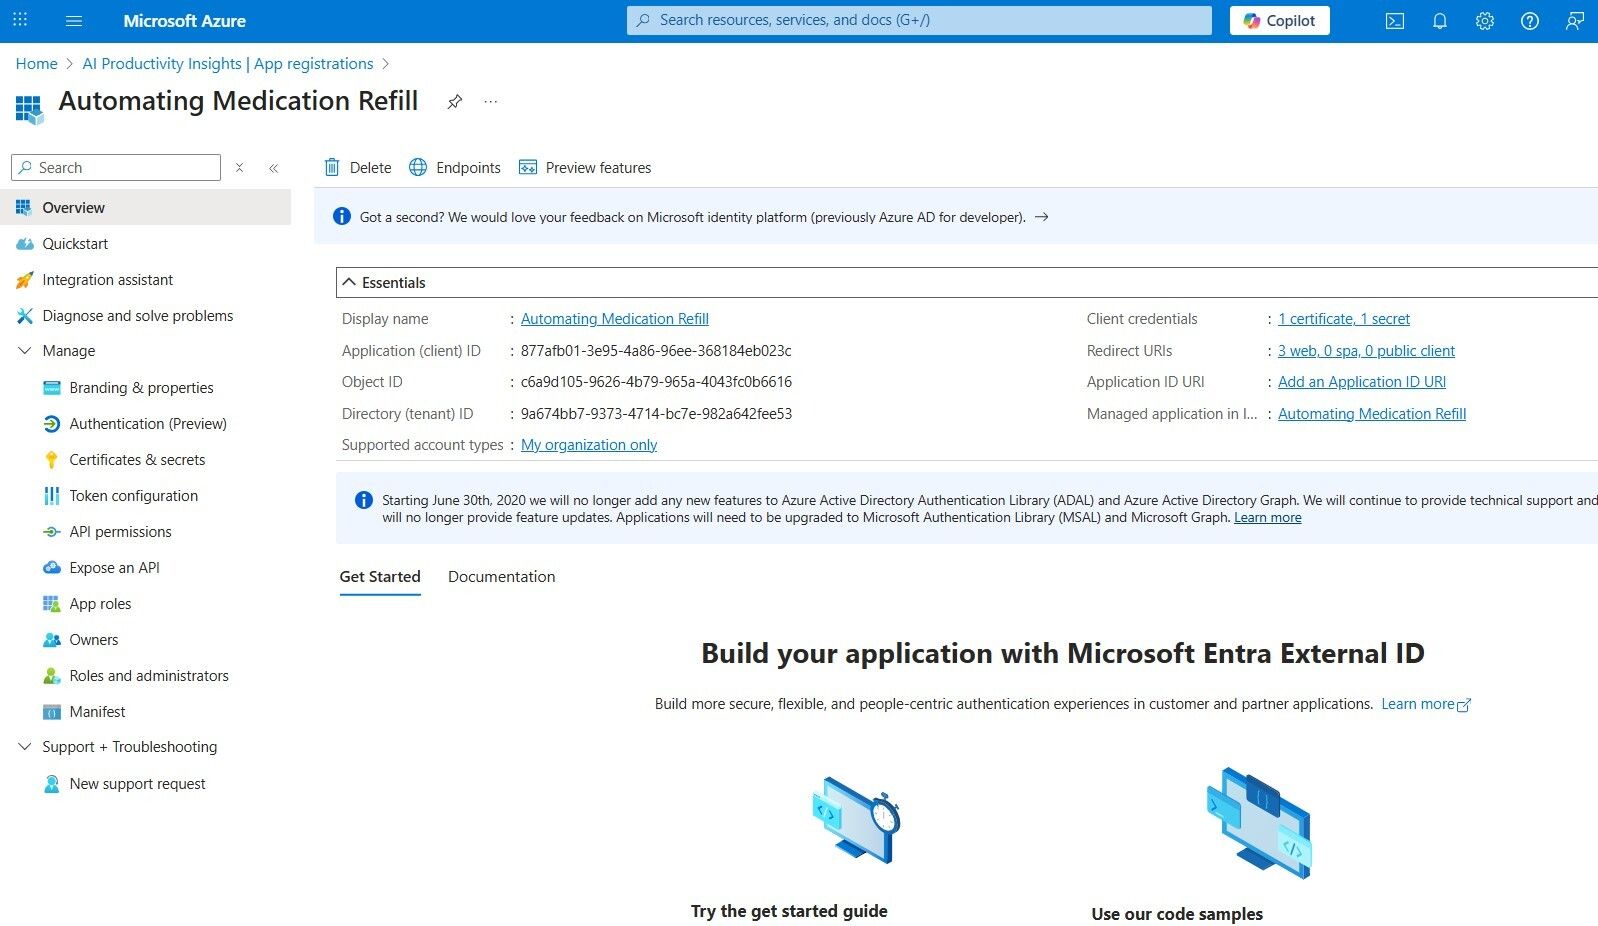
CLIENT_ID(Application Client ID)
Locate this information in the App registrations > Your App Name (Automating Medication Refill) > Overview submenu.
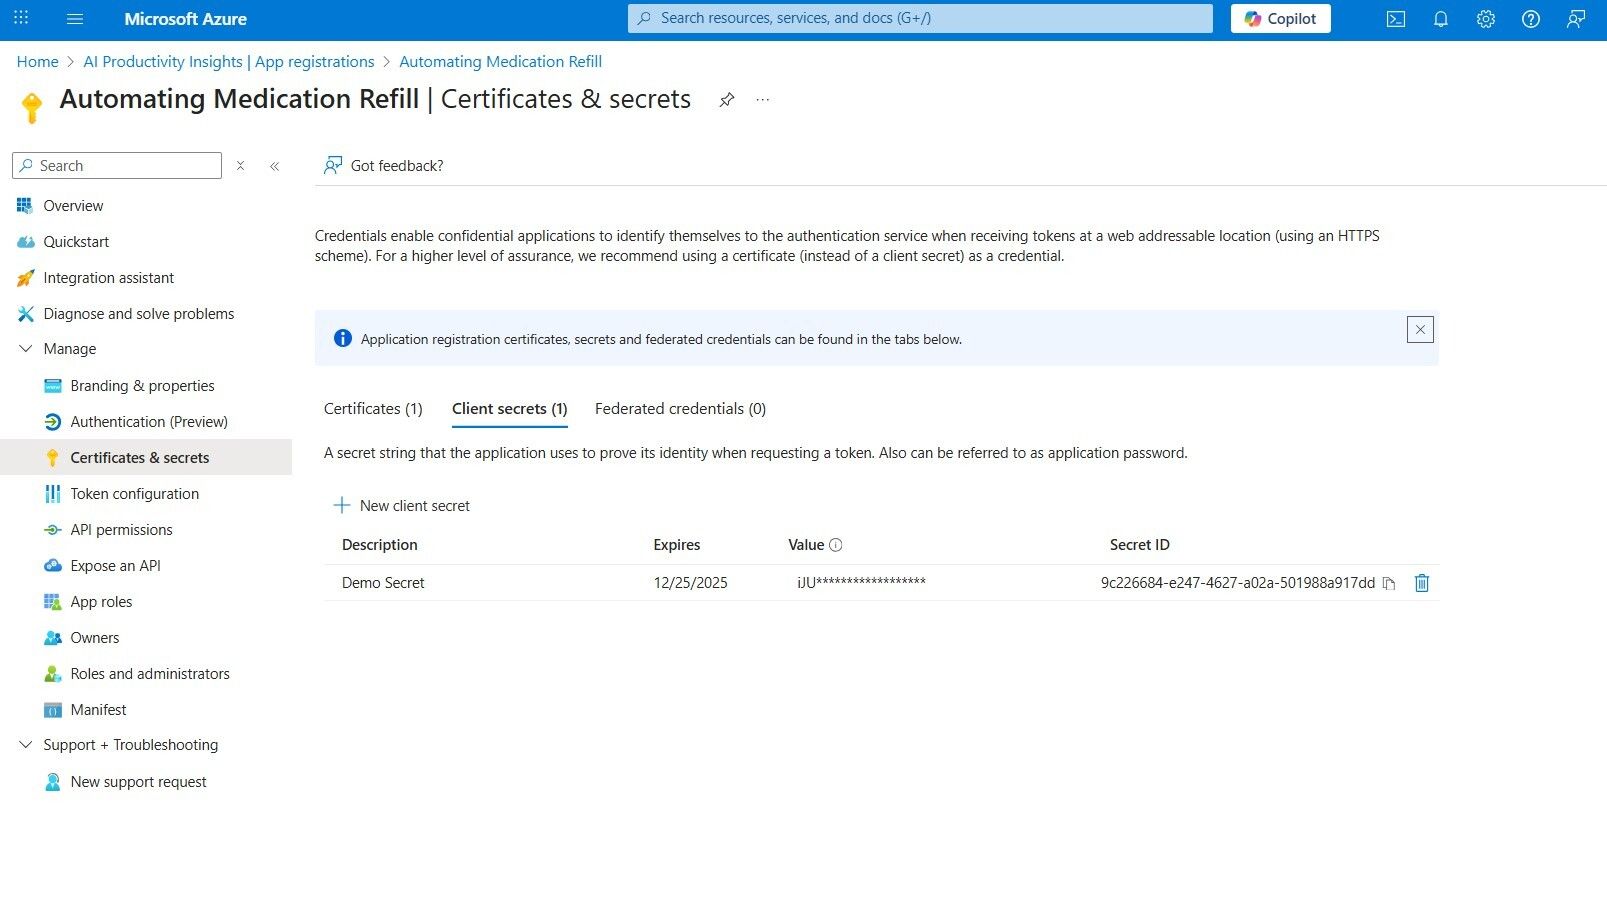
CLIENT_SECRET(Value)
Locate this information in the App registrations > Your App Name (Automating Medication Refill) > Certificates & secrets submenu.
REDIRECT_URI
Locate this information in the App registrations > Your App Name (Automating Medication Refill) > Authentication (Preview) submenu.

✅ BONUS: Verifying Step 1 with Postman Before Step 2
Before we begin coding the Flask application in Step 2, it is best practice to verify that our Microsoft Entra configuration works by testing it with Postman. This ensures that the credentials you created in Step 1 are valid and that Microsoft Graph can be accessed successfully.
1) Get Access Token
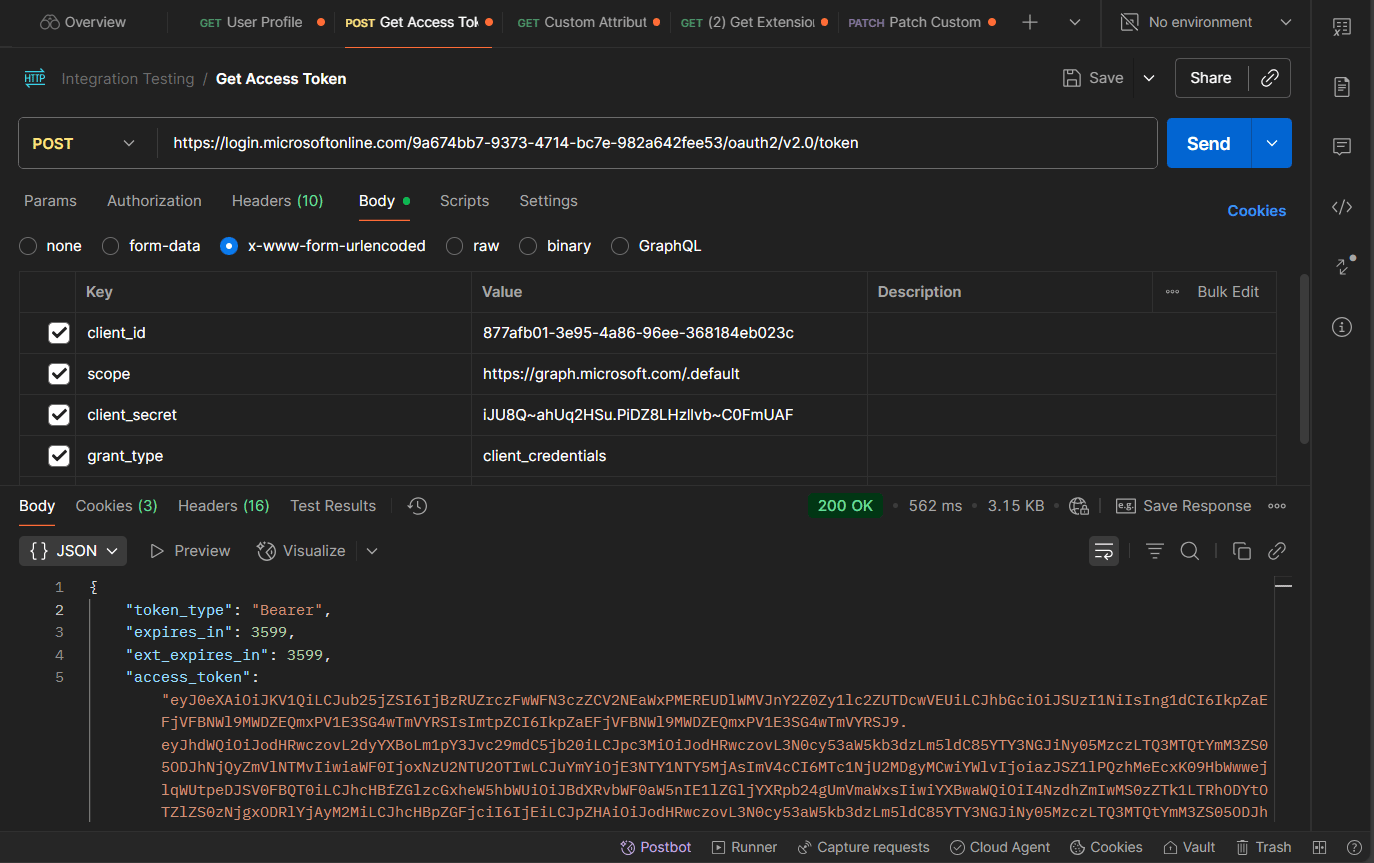
Method
POST
Endpoint (OAuth 2.0 token)
https://login.microsoftonline.com/{TENANT_ID}/oauth2/v2.0/token
{TENANT_ID}= your Entra tenant GUID.
What it does
Exchanges app credentials for a Microsoft Graph access token.
Authorization
None (unauthenticated).
Headers
Content-Type: application/x-www-form-urlencoded
Body (x-www-form-urlencoded)
Key | Value |
|---|---|
client_id | {CLIENT_ID} |
scope | |
client_secret | {CLIENT_SECRET} |
grant_type | client_credentials |
Example Response
{
  "token_type": "Bearer",
  "expires_in": 3599,
  "ext_expires_in": 3599,
  "access_token": "eyJ0eXAiOiJKV1QiLCJub25jZSI6IkVhTFRDSGxyUk1NR04..."
}
2) User Profile
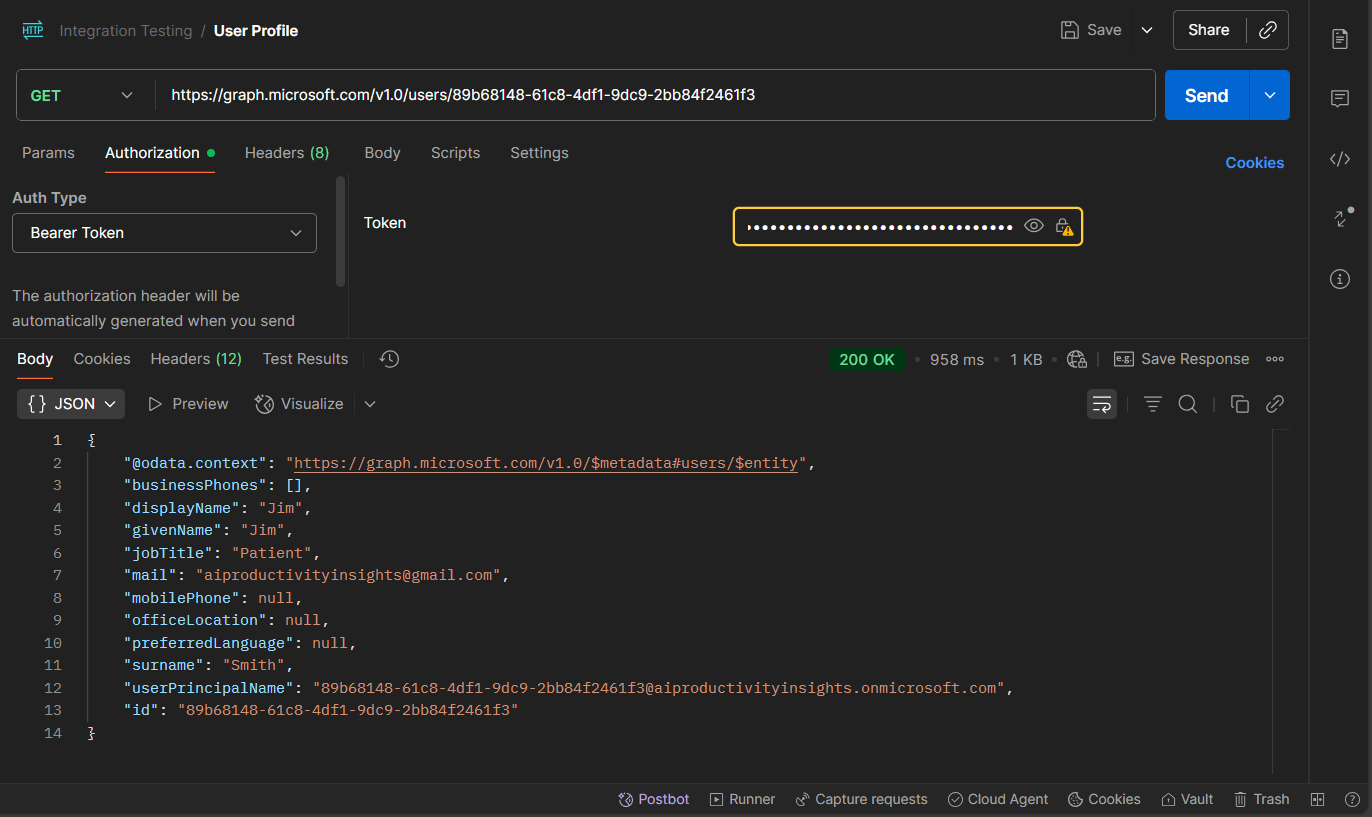
Method
GET
Endpoint (Microsoft Graph)
https://graph.microsoft.com/v1.0/users/{USER_ID}
What it does
Retrieves profile details for a user.
Authorization
Authorization: Bearer {ACCESS_TOKEN}
Headers
Accept: application/json
Body
None
Example Response
{
  "@odata.context": "<https://graph.microsoft.com/v1.0/$metadata#users/$entity>",
  "businessPhones": [],
  "displayName": "Jack",
  "givenName": "Jack",
  "jobTitle": "Patient",
  "mail": "[email protected]",
  "mobilePhone": null,
  "officeLocation": null,
  "preferredLanguage": null,
  "surname": "Smith",
  "userPrincipalName": "530772a4-d01c-4e2a-9341-6db18a16a867@aiproductivityinsights.onmicrosoft.com",
  "id": "530772a4-d01c-4e2a-9341-6db18a16a867"
}
3) Custom Attribute (Read)
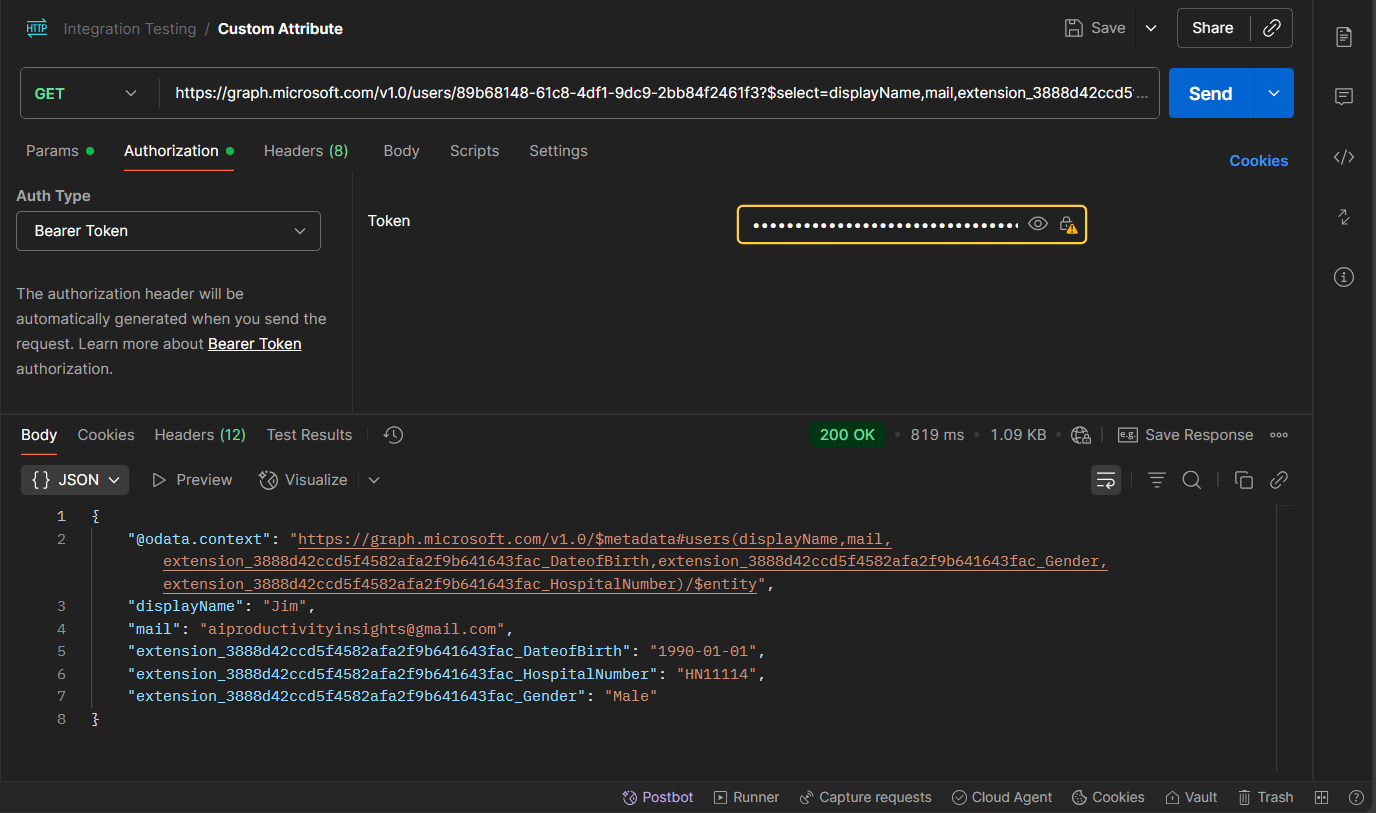
Method
GET
Endpoint (Microsoft Graph with $select)
https://graph.microsoft.com/v1.0/users/{USER_ID}?$select=displayName,mail,extension_{APPID}_DateofBirth,extension_{APPID}_HospitalNumber,extension_{APPID}_Gender
What it does
Retrieves custom extension attributes.
Authorization
Authorization: Bearer {ACCESS_TOKEN}
Headers
Accept: application/json
Body
None
Example Response
{
  "@odata.context": "<https://graph.microsoft.com/v1.0/$metadata#users(displayName,mail,extension_3888d42ccd5f4582afa2f9b641643fac_DateofBirth,extension_3888d42ccd5f4582afa2f9b641643fac_Gender,extension_3888d42ccd5f4582afa2f9b641643fac_HospitalNumber)/$entity>",
  "displayName": "Jack",
  "mail": "[email protected]",
  "extension_3888d42ccd5f4582afa2f9b641643fac_DateofBirth": "2000-01-01",
  "extension_3888d42ccd5f4582afa2f9b641643fac_HospitalNumber": "HN11112",
  "extension_3888d42ccd5f4582afa2f9b641643fac_Gender": "Male"
}
4) Patch Custom Attribute (Write)
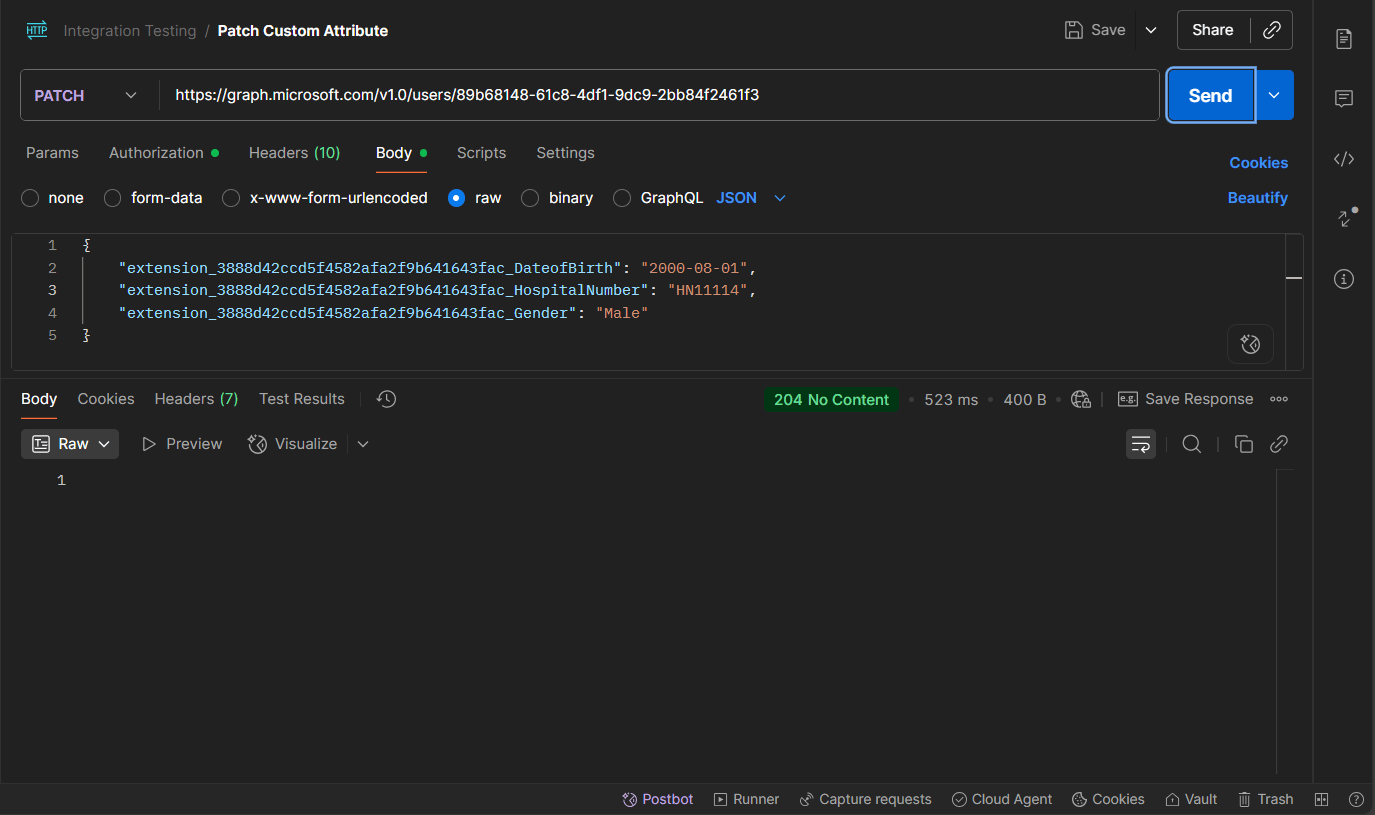
Method
PATCH
Endpoint
https://graph.microsoft.com/v1.0/users/{USER_ID}
What it does
Updates custom extension attributes on a user.
Authorization
Authorization: Bearer {ACCESS_TOKEN}
Headers
Content-Type: application/json
Body (raw JSON)
{
  "extension_3888d42ccd5f4582afa2f9b641643fac_DateofBirth": "2000-08-01",
  "extension_3888d42ccd5f4582afa2f9b641643fac_HospitalNumber": "HN11112",
  "extension_3888d42ccd5f4582afa2f9b641643fac_Gender": "Female"
}
Example Response
204 No Content
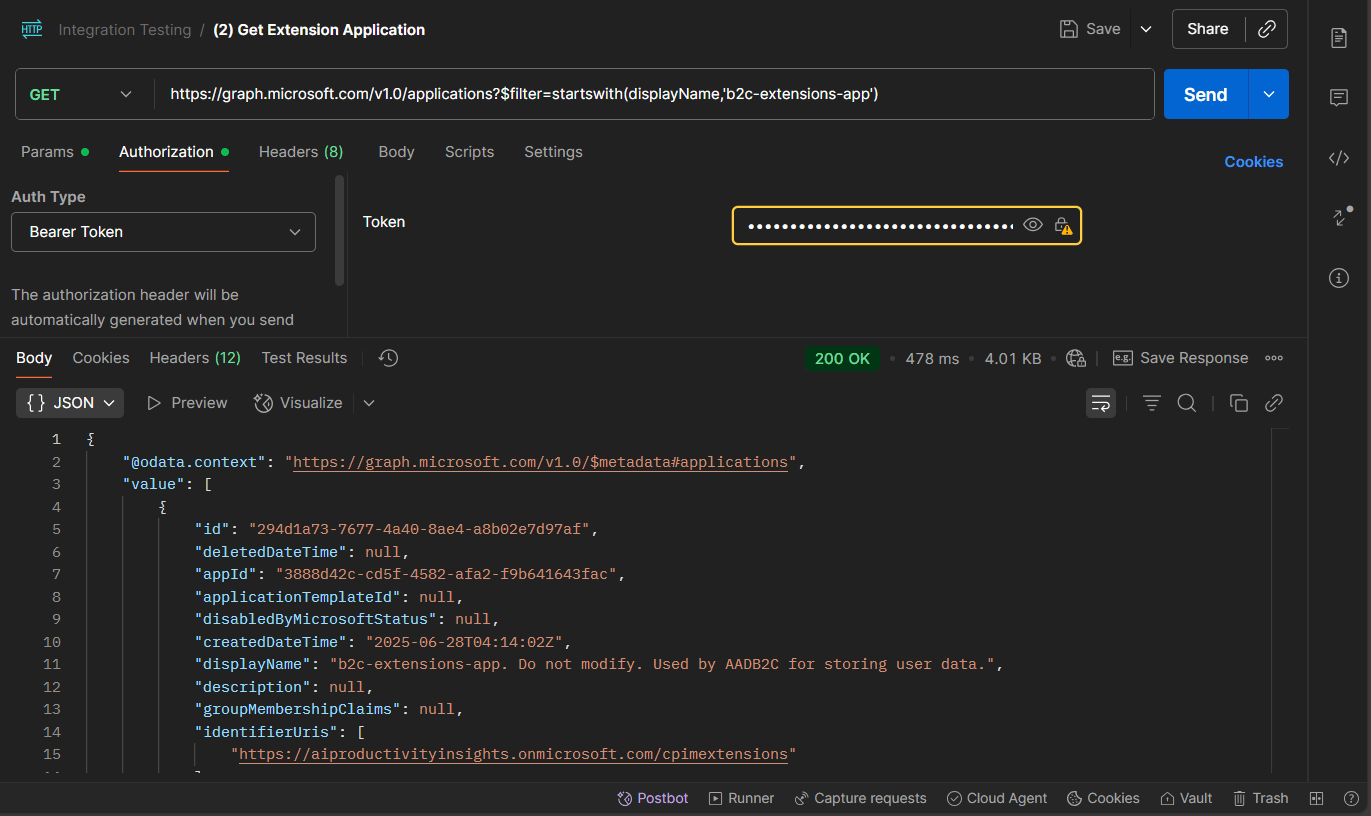
5) Get Extensions Application
Method
GET
Endpoint
https://graph.microsoft.com/v1.0/applications?$filter=startswith(displayName,'b2c-extensions-app')
What it does
Retrieves details of the b2c-extensions-app that holds extension attributes including {APPID}
Authorization
Authorization: Bearer {ACCESS_TOKEN}
Headers
Accept: application/json
Body
None
Example Response (truncated)
{
  "@odata.context": "<https://graph.microsoft.com/v1.0/$metadata#applications>",
  "value": [
    {
      "id": "294d1a73-7677-4a40-8ae4-a8b02e7d97af",
      "appId": "3888d42c-cd5f-4582-afa2-f9b641643fac",
      "createdDateTime": "2025-06-28T04:14:02Z",
      "displayName": "b2c-extensions-app. Do not modify. Used by AADB2C for storing user data.",
      "publisherDomain": "aiproductivityinsights.onmicrosoft.com",
      "requiredResourceAccess": [
        {
          "resourceAppId": "00000003-0000-0000-c000-000000000000",
          "resourceAccess": [
            { "id": "0e263e50-5827-48a4-b97c-d940288653c7", "type": "Scope" }
          ]
        }
      ],
      "web": {
        "homePageUrl": "<https://aiproductivityinsights.onmicrosoft.com/cpimextensions>",
        "redirectUris": [
          "<https://aiproductivityinsights.onmicrosoft.com/cpimextensions>"
        ]
      }
    }
  ]
}
Why This Matters
By testing with Postman before starting Step 2, you:
Confirm your Entra External ID tenant is issuing tokens correctly.
Verify that Microsoft Graph permissions are working as intended.
Ensure the custom attributes you created in Step 1 are accessible.
Once this validation succeeds, you can confidently proceed to Step 2, where your Flask application will consume these same values to authenticate patients and handle medication refill requests.